About this
project.
Hi! We're a small team at Institut auf dem Rosenberg in St. Gallen. This whole site is a school project — a concept for a wooden bridge on our campus that makes its own electricity from people walking on it, and that even catches its own rain water. Nothing here is built yet — it's an idea we designed, drew, and tried to make as realistic as we could.
Three of us made this.
Came up with the whole idea, drew the plans and figured out how the bridge should work. The one who kept asking "but what if it could also…".
Helped research materials, costs and the energy side, and checked the numbers along the way.
Helped with the design, the drawings and putting the whole presentation together.
Why we made this.
We walk across campus every day, and we kept thinking: that's a lot of footsteps doing nothing. In some train stations in London and Tokyo, the floor tiles already turn footsteps into electricity. So we asked ourselves — could a school have something like that, but smaller and made of wood?
That question turned into this project. We're not engineers (yet 🙂) — most of the numbers are estimates based on real products and papers we read. But it was a fun way to learn about timber construction, energy storage, rain-water harvesting, and how a real architect puts a project together.
From a rough idea to a real drawing.
We used the DALL·E AI image generator to picture our bridge. We told it exactly what we wanted — reclaimed wood, the dimensions (12 m long, 2 m wide), the railings, the concrete supports — and then asked it to make each version more realistic and to add technical drawings. Here are the steps we went through.
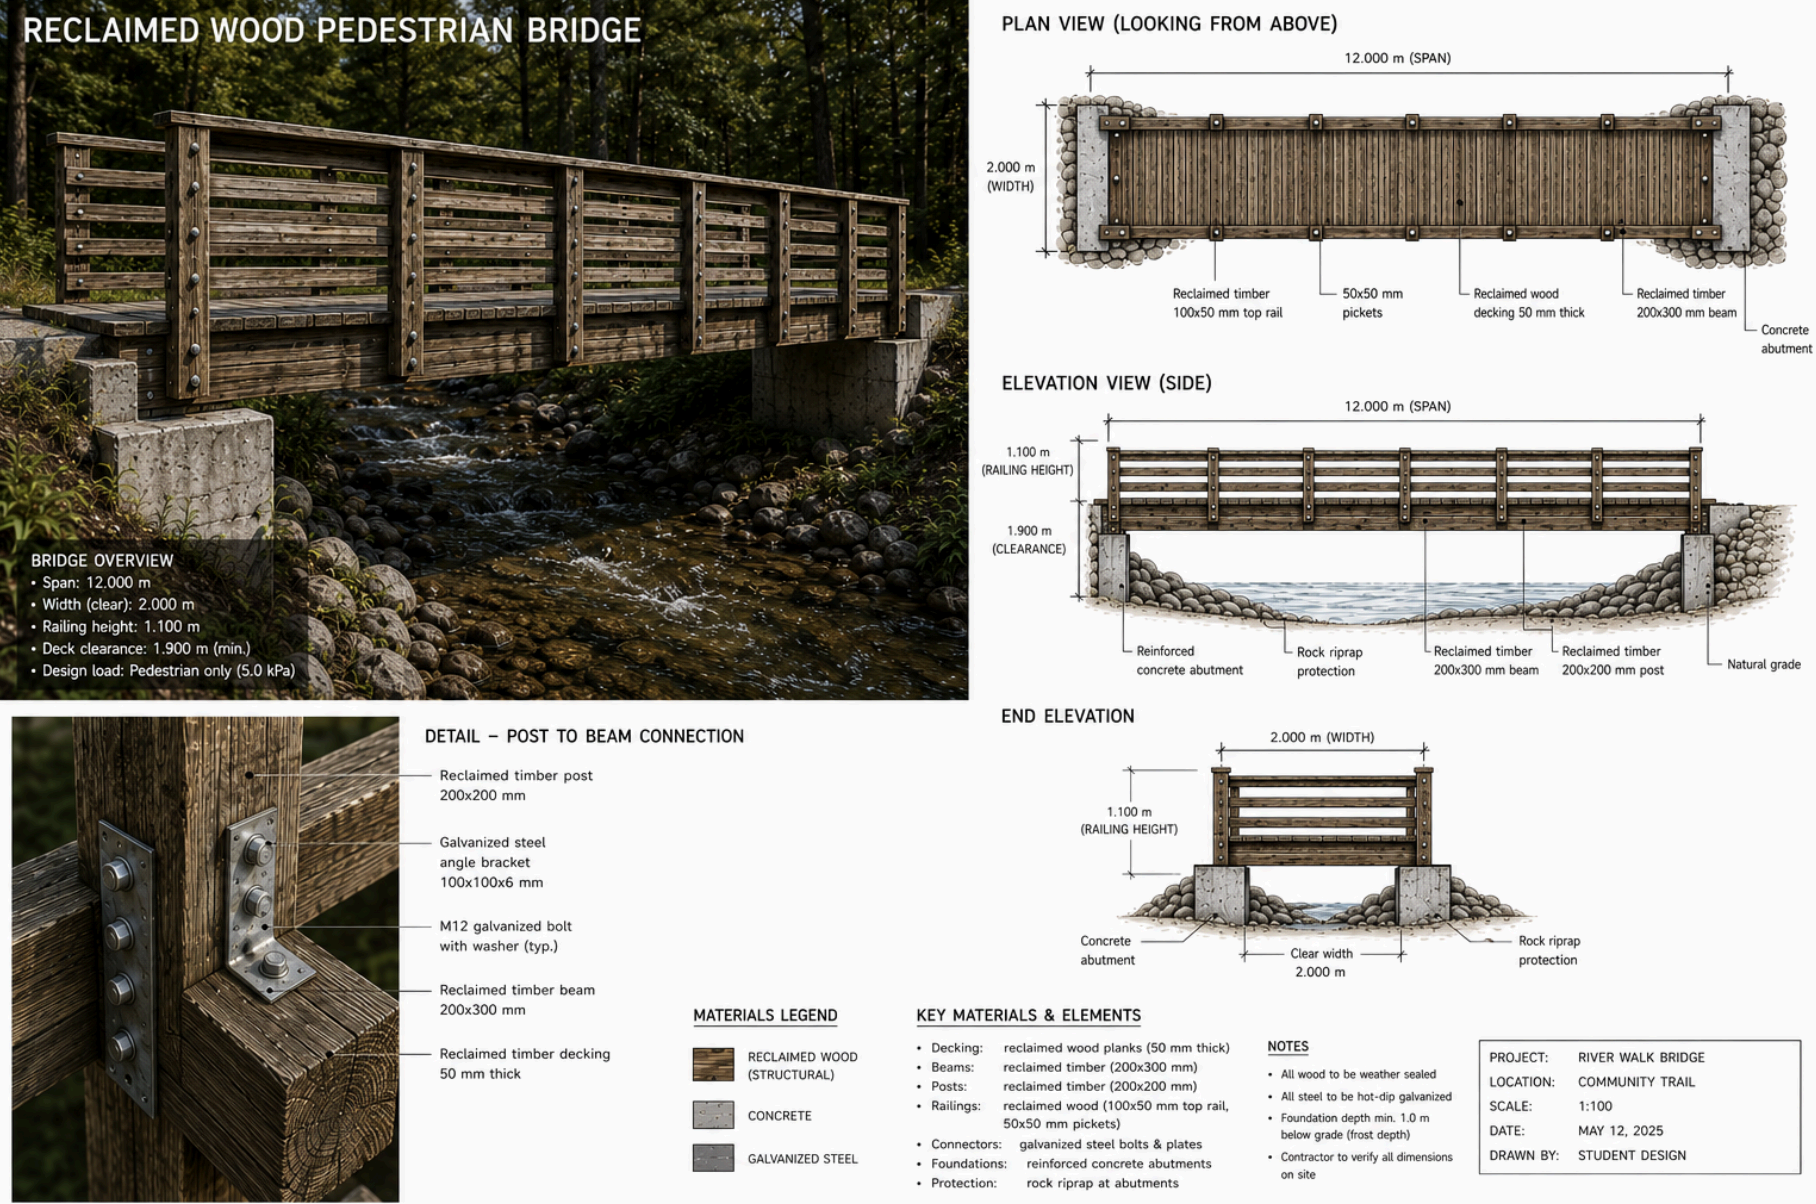
First idea
"Create a realistic pedestrian bridge made from reclaimed wood over a small river in a forest. 12 m long, 2 m wide. Reclaimed timber beams and wooden railings, concrete supports, realistic wood texture, with plan view, side elevation and a detail sketch."
Our very first image. It already had the look we wanted — old wood over a stream — plus simple technical drawings.
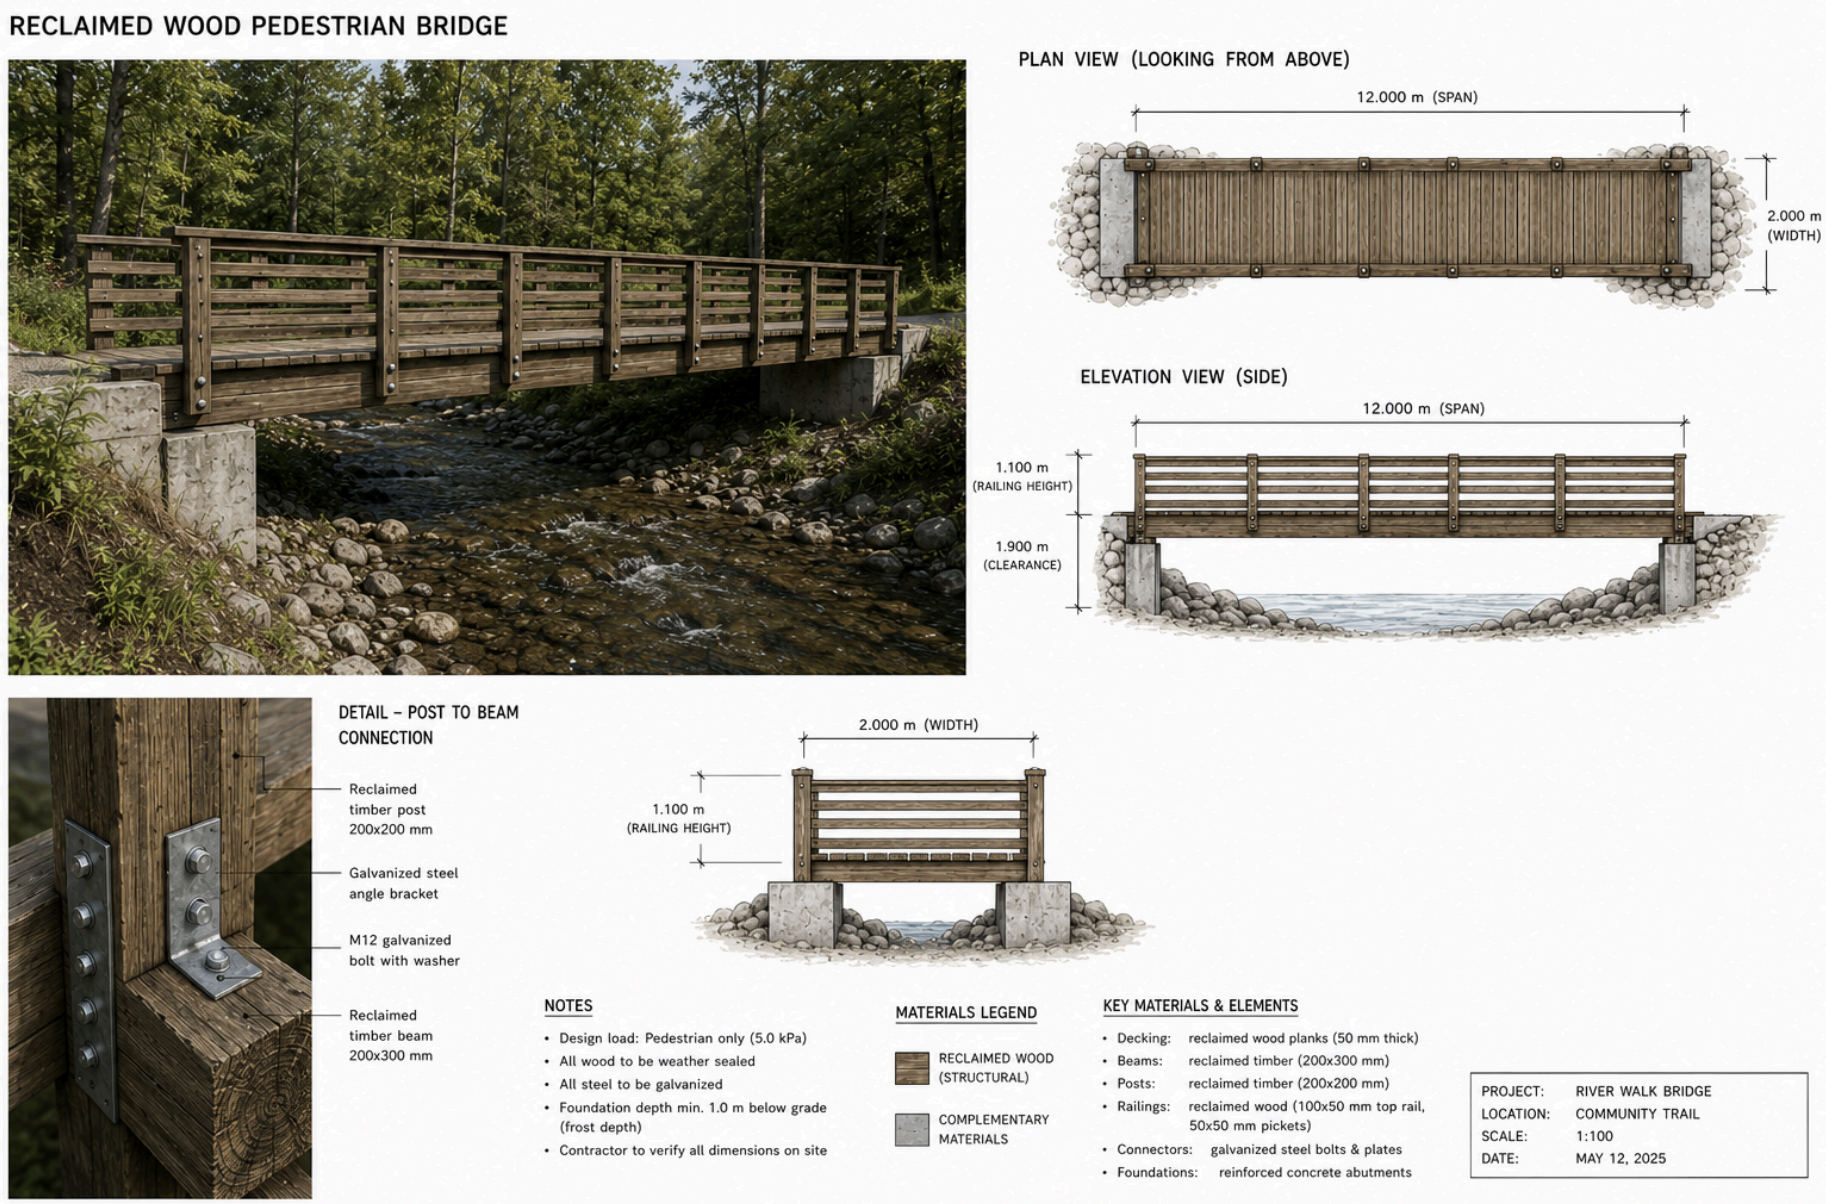
Make it more realistic
"Make the bridge more realistic."
The wood got more texture, the river and rocks looked natural, and the drawings gained an end-elevation view.
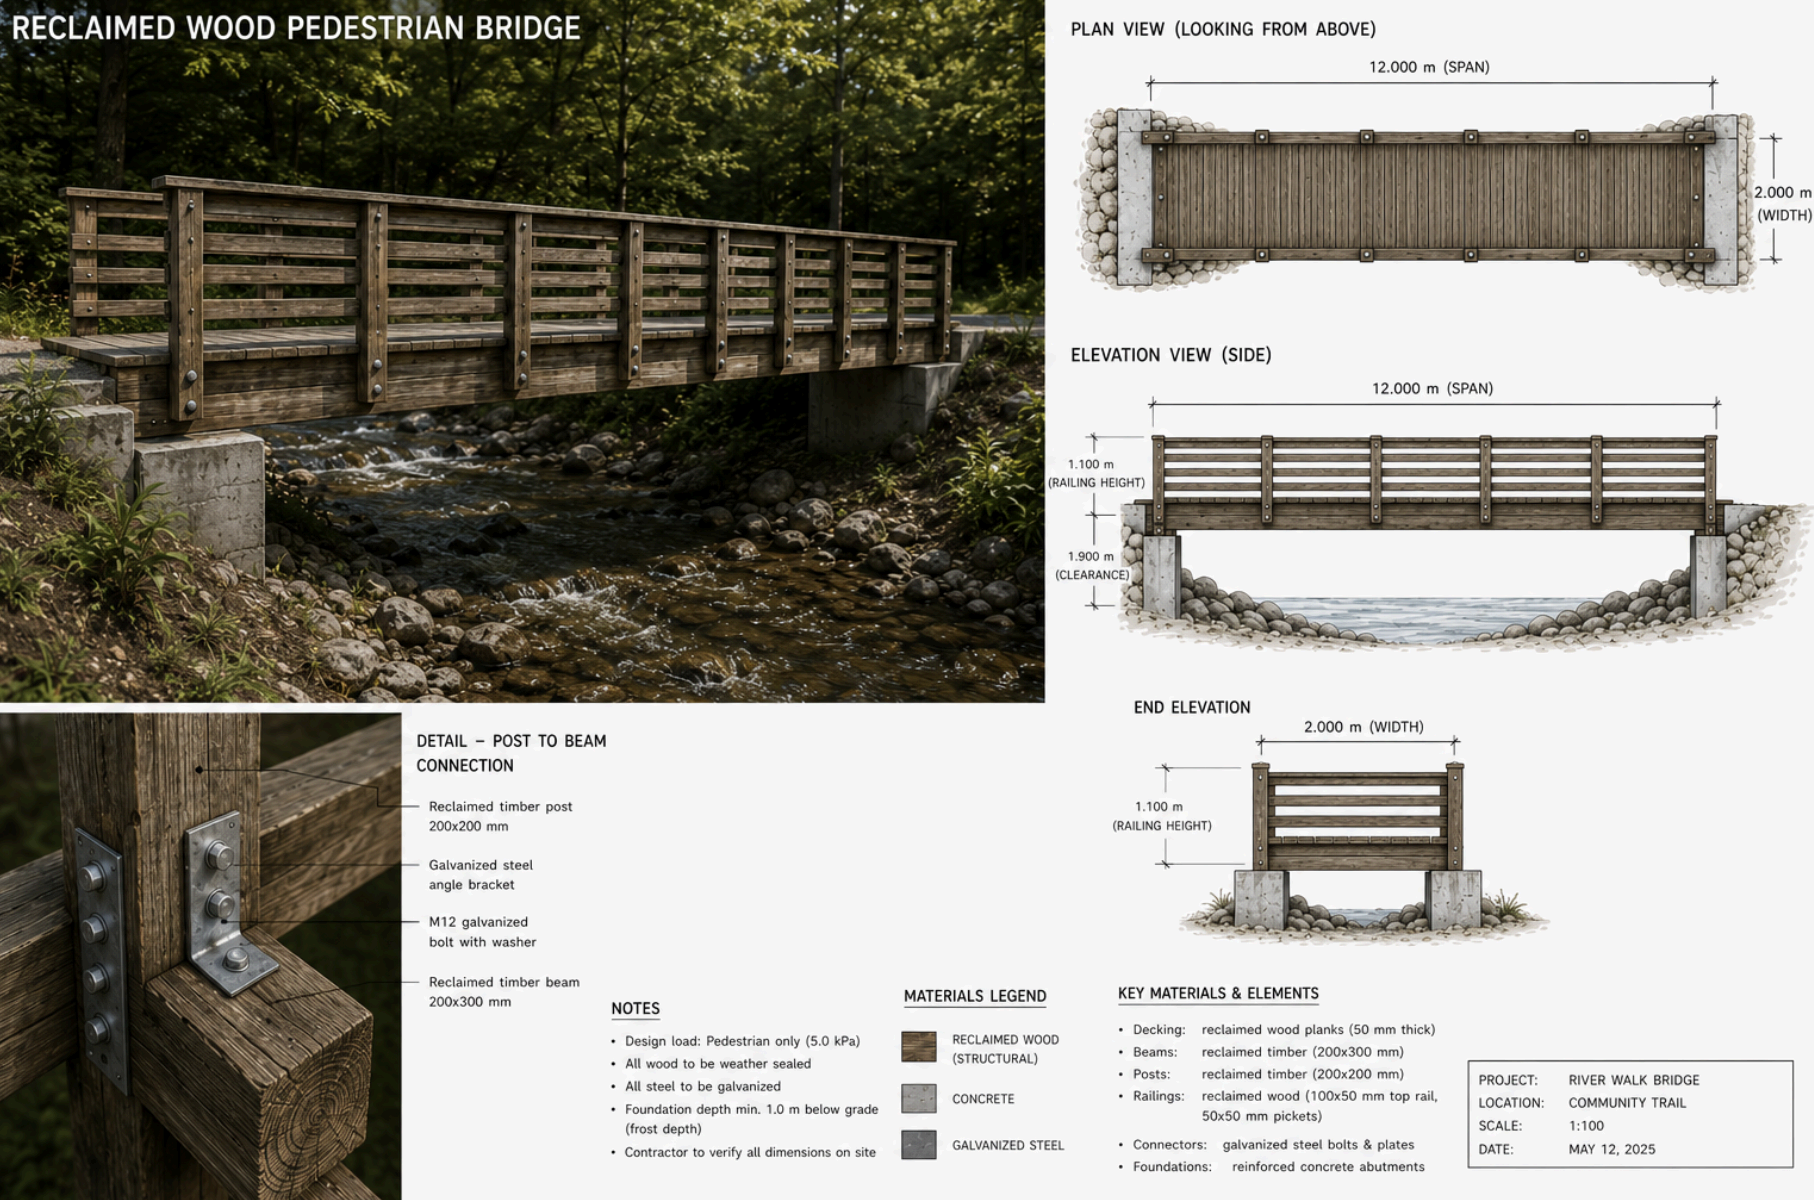
Add dimensions & labels
"Add technical dimensions and labels."
The final version: every part is labelled (beams 200×300 mm, posts 200×200 mm, riprap protection, concrete abutments) — ready to explain to a teacher.
Gustav's stick model.
To check that our idea actually holds up, Gustav built a small model of the bridge out of wooden sticks. It helped us feel the real shape, test how the beams cross, and see where the deck and railings go — before drawing the final plans.
The model is made entirely from thin wooden sticks glued together — just like the reclaimed timber beams would be in the real bridge, only much smaller.
Building it by hand taught us a lot: how many beams we really need, how the triangles keep everything stiff, and how the walkway sits on top. It turned a drawing into something we could hold.
Listening, then making it better.
A good project gets better when other people look at it. Here is one important piece of feedback we received — and exactly what we changed because of it.
“Think about integrating the irregularity of reclaimed wood — size, colour, texture, thickness. Do you want to emphasize it and give it design purpose?”
At first we treated the wood's differences as a problem to hide. The feedback flipped our thinking: instead of fighting the irregularity, we decided to make it the whole design idea.
We turned the mismatched boards into our "patchwork" look — every plank's own colour, grain and history is shown on purpose, like a quilt made of wood.
Different board thicknesses are levelled with a hidden support layer underneath, so the walking surface stays flat and safe while the top still looks varied.
We plan to sort boards from light to dark across the deck, so the random colours become a gentle gradient instead of looking messy.
Rough and smooth surfaces are kept on purpose — rougher boards give better grip when it's wet, smoother ones for the handrail.
You can see this idea explained in more detail on the Materials page, under “the patchwork concept”.
Old wood, a second life.
The most important material in our bridge is reclaimed wood — and the best part is that we can often get it for free. Here's what we found out.
Wood that already had a life — old barns, factories, or buildings that get taken down. Instead of being thrown away, the beams get a second life in something new.
It's often free or very cheap, it saves living trees, and it has a lot of character. Old wood is usually very dry, which means it's stable and doesn't warp much.
Before using it we read that you must remove old nails, check for cracks and rot, re-cut the beams to size, and seal them against weather. An engineer has to grade the wood to make sure it can still carry weight.
Free from demolition sites and old barns, from online give-away marketplaces (Ricardo, "gratis abzugeben"), and from local Swiss sawmills that sell off-cuts cheaply.
Sources we read: Wikipedia — "Reclaimed lumber" · Holzbau Schweiz (Swiss timber association) · FSC / PEFC certification guides · Pavegen & Energy Floors articles on kinetic flooring.
Every part has a place to come from.
In easy words — this is every single part of the bridge and where we would get it from. From the wood and the floor you step on, to the rain gutter, the railings, the screws and the lights.
≈ CHF
80k – 100k
We wanted a number that's actually realistic to build. Because the structural wood is free reclaimed timber, the budget mostly goes to labour, concrete, the kinetic floor and getting everything safely on site. These are research-based estimates for Swiss prices — real quotes could be ±20%.
Sources: SIA / CRB Swiss building cost references · Holzbau Schweiz labour rates (≈ 90 CHF/h) · Pavegen & Energy Floors price ranges · local concrete & steel supplier quotes.
Free reclaimed wood saves roughly CHF 15,000–25,000 compared with buying new glulam — which is what keeps the whole bridge inside the 80k–100k range.
How we worked on it.
People who helped us.
A school project is never really just three people. Big thanks to our teachers, classmates and families who answered our (many) questions.
Our design teacher
Feedback on every draft
Our physics teacher
Helped us sanity-check the watts
The STEM lab
Let us prototype a tiny piezo tile
Classmates
Walked over our sketches often
Our families
Patience + late-night proofreading
Online sources
Wikipedia, Holzbau Schweiz, Pavegen
DALL·E
Helped us draw the bridge designs
Institut Rosenberg
For the assignment + the campus
What we'd still like to figure out.
We used 5–8 W from product datasheets. We'd love to actually measure it on a small prototype.
St. Gallen gets snow. We need to think more about ice on the deck and how the panels behave at −10 °C.
Who fixes a panel when it breaks? We'd like to design a cover that any caretaker can pop open.
Our number is a careful estimate. We'd love to get a real quote from a Swiss timber workshop one day.
That's our project. Hope you liked it.
If you're a teacher, a classmate, or just someone curious — feel free to click through the other pages. The How it works page is a good place to start: it explains the whole bridge, step by step, in plain language.